Setting up a fully managed website in AWS
Finally, I finished migrating my website from a web hosting platform to AWS.
Although the process is not always straight forward, it opens a whole world of opportunities: adding or removing servers elastically, as demand grows up or down, handling failure policies, in case of a whole set of servers going down, and more.
The purpose of this post is to describe, step by step, the architecture that I implemented in AWS in order to host my site, also sharing some tips and lessons I've learned in this journey in hope that it will save others some hurdles.
The architecture that I've implemented for hosting a web site can easily suit also other use cases, such as web applications, e-commerce sites and more.
So, let's start from the beginning:
Creating the basic 'virtual space':
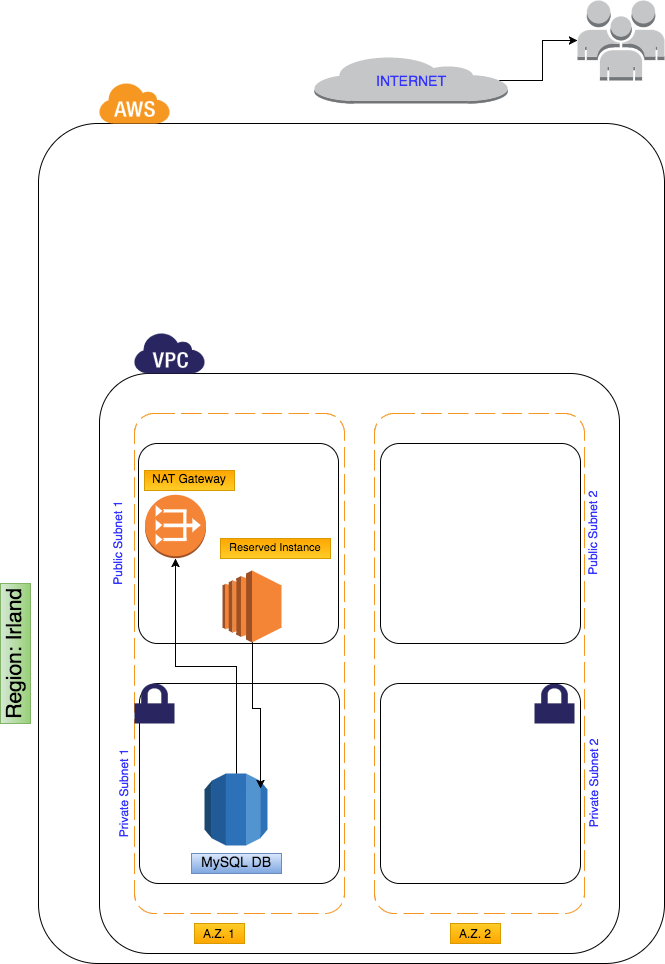
- The first step includes setting a VPC (Virtual Private Cloud). As its name suggests, it is a 'private network' within AWS cloud. It has a specific range of IP addresses, which can be allocated to the resources that are being created.
- The VPC in my case (and as mentioned early, this setup can suit many other scenarios), is divided in 4 subnets: 2 private and 2 public ones. Each pair of private-public subnets is placed in a specific Availability Zone (A.Z.) This setup improves the durability of the site, in case of a total failure of a whole datacenter (aka. A.Z.).
- Instances placed on the private subnet can not be accessed from the Internet, and by default have no access back to the open world. In order to allow communication from the private subnet to the Internet (mainly in order to get software updates), a NAT gateway is created and placed on one of the public subnets. The sole purpose of the NAT instance is enabling safe traffic from the private subnet to the Internet.
- Once the subnets are created, I placed one instance (the one hosting my WordPress site) on one public subnet and a MySQL instance, serving as database of the WordPress platform, on the private network.
Adding 'elasticity' and 'durability'
5. Two of the greatest features of a cloud service (and of course AWS) are their built-in mechanisms of auto-scaling as traffic (or other needs) grows up and down and the enhanced durability, ranging from the handling failure of a single instance and up to the failure of a whole availability zone or even region.
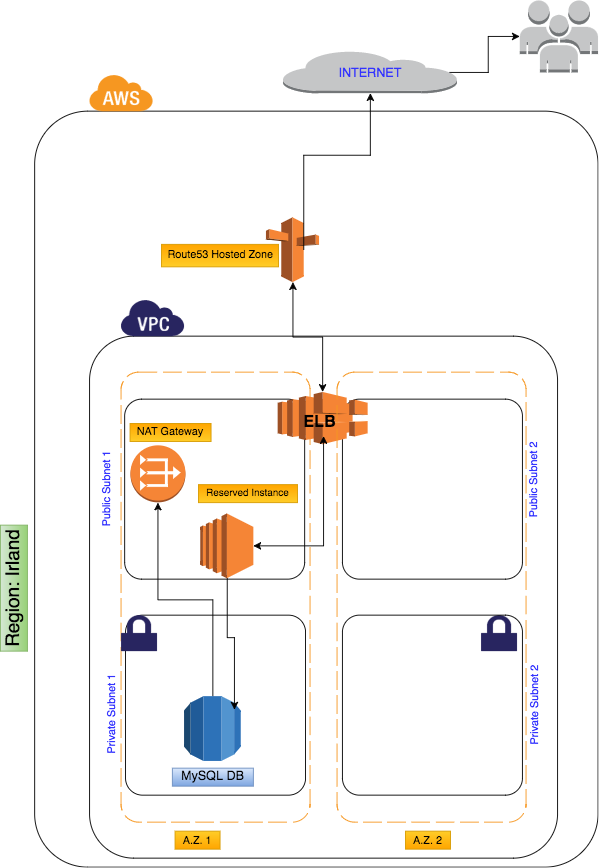
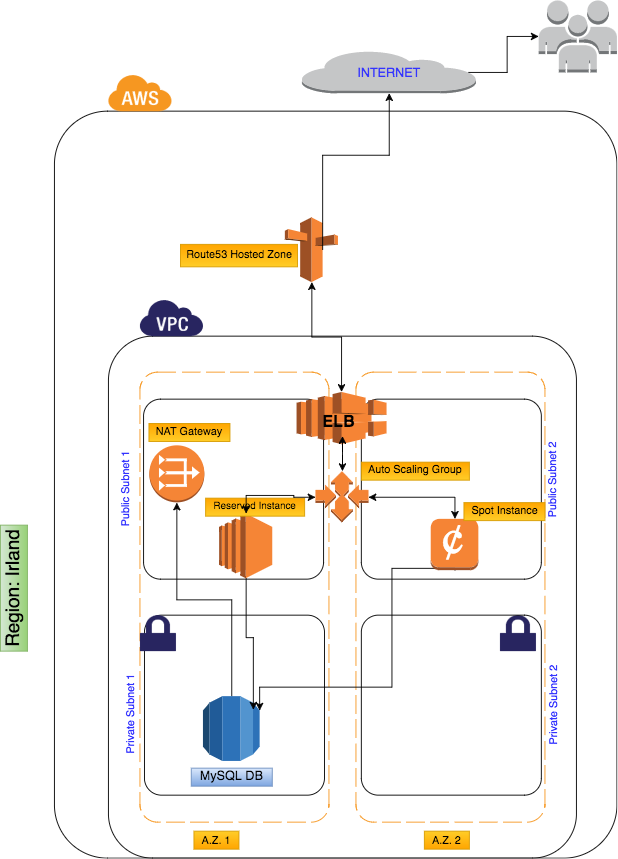
AWS offers several services for enhanced elasticity and durability. I chose to implement three of them: an Elastic Load Balancer, an Auto-Scaling service and a failure policy thru Route53:
The Elastic Load Balancer (ELB) service is a tool that in fact has two purposes: constantly checking the health state of associated instances (and hence routing traffic only to healthy ones) and balancing traffic evenly across associated instances. In order to manage my costs in an effective way, I associated one 'fixed' Reserved Instance to the ELB (since it serves a 24/7 site, I decided pre-paying for it for a whole year and thus 'reserving' the resource)
AutoScaling: a second, optional Spot Instance, which will be launched in case of increased traffic and associated to the ELB, is triggered thru the Auto-scaling mechanism. Also in this case, in order to manage costs, I decided to 'bid' for a maximum price for this additional resource, under the assumption that higher traffics on a specific site are not related to spikes of demands in the whole availability zone. The auto-scaling service will shut down the additional instance once traffic goes down and can be served by a single instance. In the future, if traffic is higher for longer periods of time, the auto-scaling policy can be modified seamlessly so that more instances are optionally triggered.
Routing traffic
Since I'm hosting my domain also under AWS, the next taken step is configuring creating a hosted zone under Route53 service so different variations of the site name and subdomains are routed to the correct instances.
Since I'm using an ELB, which serves as umbrella for routing traffic to any number of associated instances, an 'A' record is created mapping between the domain name and the ELB resource name.
As I will describe in a later step, one great feature of Route53 is its 'failure policy', which lets you route traffic to a completely different region or to a static site (hosted under S3), in case of total failure of the current region.
Reducing Internet latency
One of the worst things a site can experience is low latency: it is well known that even few seconds of waiting time till the contents of a site show up, might translate in high bounce rates (e.g. high number of people leaving your site even before a single bite of information shows up on the screen).
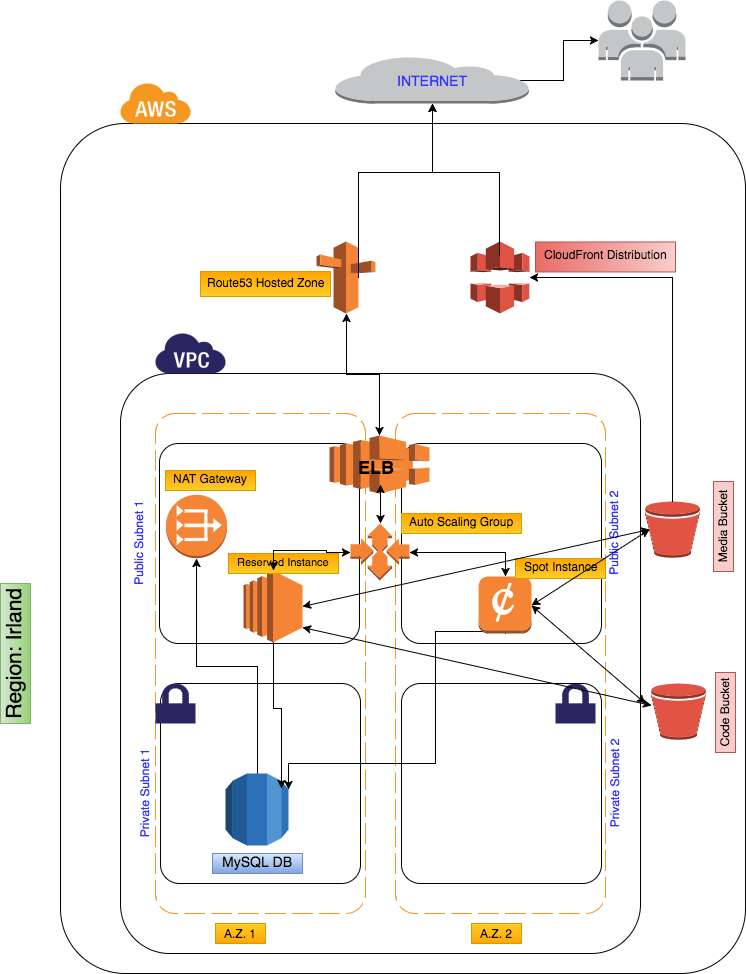
AWS offers a fully managed Content Delivery Network (CDN) or 'content replication' service called CloudFront: this service is meant to cache and replicate web contents (such as media files) across many 'edge points' spread worldwide, thus reducing latency issues to a minimum.
In order to have updated contents propagated across the edge points, the following mechanism is implemented:
- Using a built-in Linux synchronization service, I replicate every few minutes the updated contents of the site to an S3 bucket containing the media files. (In fact two buckets: one holding media files and one holding the whole site's code. This second bucket is the base of any new launched instance).
- The S3 media-bucket is used as source by CloudFront service.
Since transfer of data between AWS services within the same region is free of charge, and since there is a constant transfer of data between the instances media files and the S3 bucket, I defined the bucket in the same region as the VPC.
Adding some extra fault tolerance
As explained earlier, Route53 service offers several routing policies, which can even be combined and intertwined.
In my case, I decided to add an extra layer of fault tolerance, thru the failover policy: all the resources within the VPC are associated to the 'primary' record type (e.g. I created several 'A' records mapped to the ELB and defined them as primary record types). In case of a major failure (two availability zones going down, or a major bug in my site), Route53 seamlessly will route all the traffic to the 'secondary' resource: in my case a static website hosted in an S3 bucket.
Seeing the whole pictures
AWS tags are a great way of mapping all the resources allocated to a specific project, thus letting you see the 'whole' picture of all involved resources across all regions, and of course letting you track costs in a consistent way.
So, in my case, for all the resources that I created, I added at least one tag: 'project' with my project name as its value.
Now, I can open the 'resource group' tool, create a new group and review all the resources associated with my project.
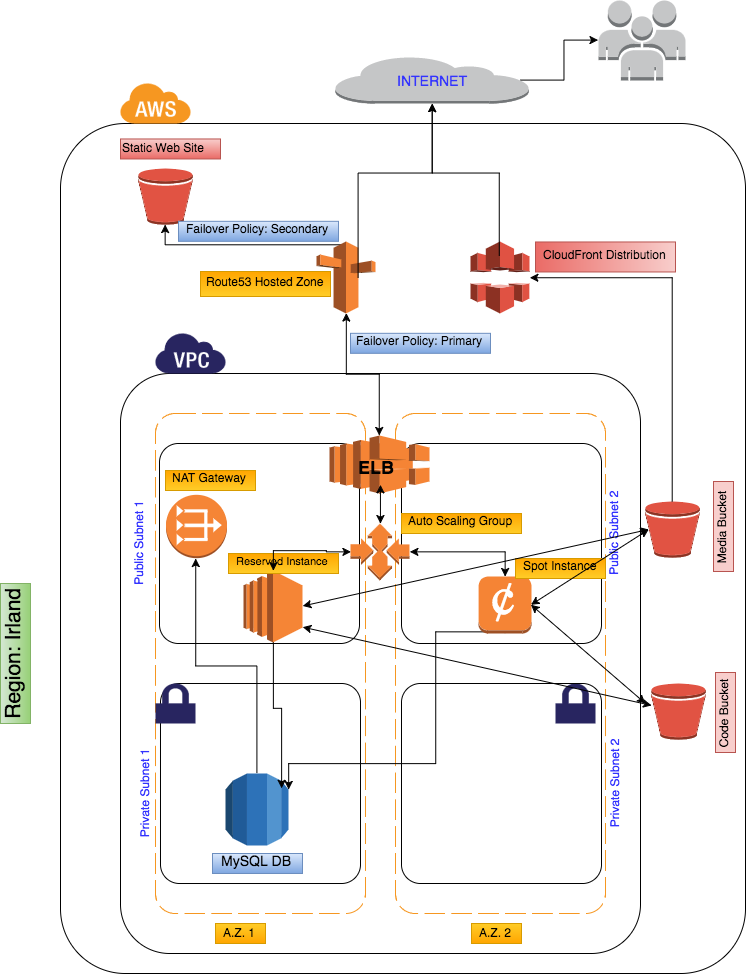
That's it, more or less, the whole picture of this project.
I hope you find it useful!